
Thanks to Microsoft Office’s dominance, it is likely that you are using Outlook at work, at school or have even begun using it for your personal email.
As many of you know, I am a big Outlook Fan. I have discussed my love for Outlook before. I think one of my biggest learnings when it comes to Outlook is the difference knowledge of it’s features makes. Using Outlook’s ‘Rules’ alone, you can become a ‘no-spam-ninja’ within a month, delay sending emails so you avoid BSAK errors among others.
And then, you can take it to the next level by using Macros. A macro I have blogged about before is the ‘Never forget an attachment again’, a 1 step process that will alert you every time you say ‘attach/attached’ in an email and forget the attachment. (In a hurry, you may still miss this! But well, it helps 80% of the time.. :))
That brings me to the purpose of this post – to present to you – ‘The coolest simple Macro of them all’ – the FolderSort macro.
If you are using Outlook, you probably have folders to transfer emails into after you have read them. And most likely, you are dragging and dropping them into these folders which, over time, is a massive productive drain.
And thanks to this genius macro, I have not had to do any dragging and dropping for over 3 years now. It is a 5 step process and will work well for you. All you have to do is follow the process and you are a comment away if you have any questions of course.
Essentially, it’s 10 minutes of investment now or 100s of minutes of lost time dragging and dropping emails.
Before you begin, here’s what success will look like (screenshot from my own Outlook)
(The second is zoomed in).
Essentially, what we are going to do is make these buttons – 1 for every folder that you have on your Outlook.
Step 1 – Copy the Macro from here and copy the code. (The significance of the red is mentioned in the steps below)
Step 2 – Go to Tools -> Macro -> Visual Basic Editor

Step 3 – Copy the code into the window (on the left, might have to open up the ‘Project 1…’ till you get to ‘ThisOutlookSession’. the copied code will look like this.

Step 4 – Replace the red folder names with your real folder names
A small note here – please keep your folder name to 1 word to keep the code simple i.e. no ‘Personal Emails’ – just ‘Personal’.
If you would like 5 such buttons, just copy it 5 times and change the folder names accordingly.
Step 5 – You are essentially done. All you need to do is put it up on your Toolbar.
Right click anywhere on your toolbar and click on Customize

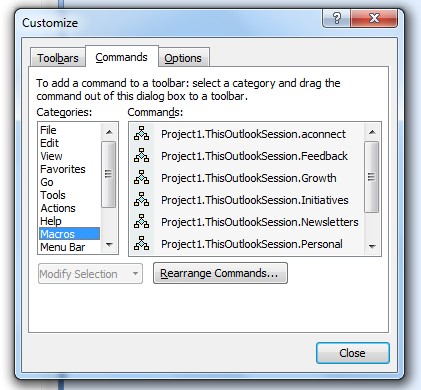
Just drag it onto your toolbar and voila your button is ready! Now you can customize it all you want.. Right clicking it will give you many options. You can change the name, edit the button image (as you can see, I have little colored images on mine)

This is as simple as it looks. As always, your questions are very welcome in the comments.
And of course, if you do decided to give this a shot and get these installed, do share your experience too!
—
This post is thanks to a certain Donna, from the community at AVC who asked for the Outlook macros. I hope you all find it useful.
